If you sell software that runs inside a customer's environment, auth gets weird fast.
You're not building a single, cloud-hosted app anymore - you're shipping a product that has to run in their network, with their identity provider, and under their security policies. That means:
- Data can't leave their network. All auth decisions (login, session validation, rotation, key management) must happen in their environment.
- External traffic is restricted or blocked. It's also not just auth decisions, you may be limited in what third-party APIs you can call.
- The customer's IdP is the source of truth. Sign-ins must go through Okta/Entra/OneLogin/etc., not your own login form.
- User provisioning is automated. You need to sync users from their directory into your app, and disable them when they leave.
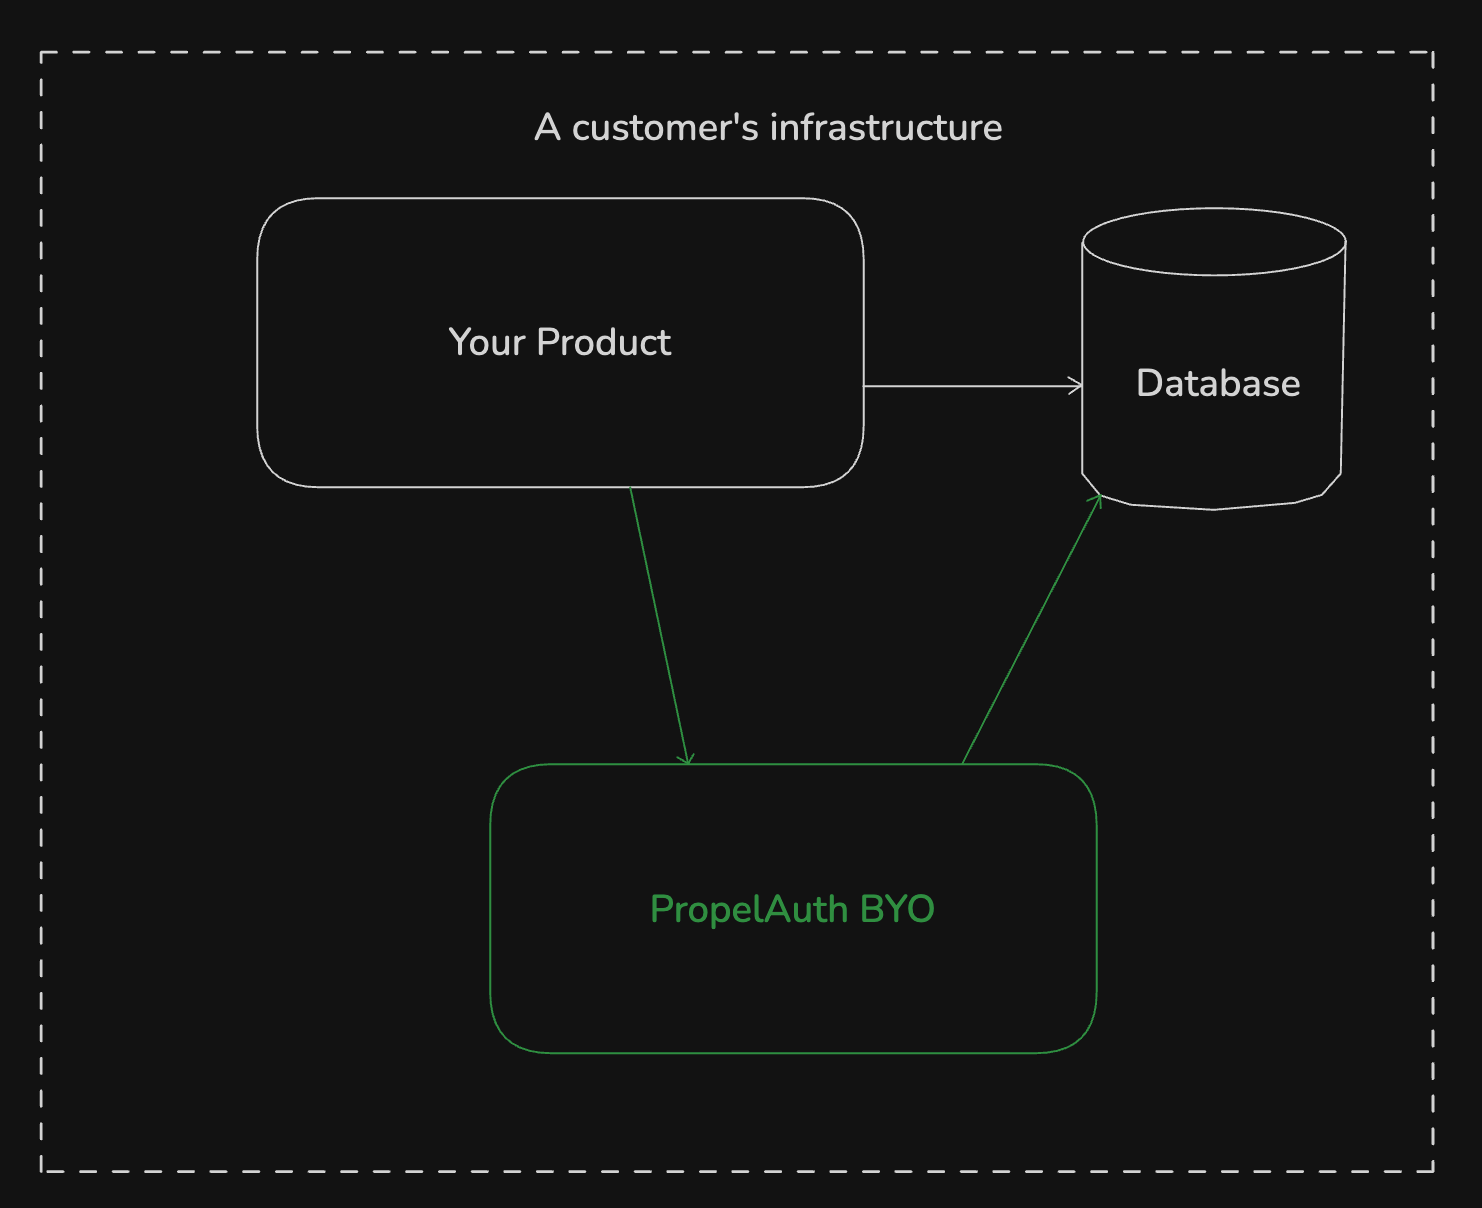
Traditional "auth as a service" patterns break here because they often require data, login flows, or session validation to go outside the customer's network. The fix is simple in concept: put the auth logic next to your app, not across the internet.
Most existing self-hosted auth solutions are clunky, hard to operate (meaning hard for your customers to operate), and hard to integrate with your existing app.
That's where PropelAuth BYO comes in. It's a self-hosted authentication sidecar that runs inside the customer's network. It's designed to be:
- Easy to operate - built in Rust for low resource use, includes detailed JSON audit logging, and has only one dependency (Postgres).
- Easy to integrate - simple, well-documented SDKs for all major languages.
- On-prem first - all auth decisions happen locally, with no external calls required.
Let's walk through how to build a complete on-prem auth flow with SSO, SCIM, and sessions.
Guide: On-prem example with SSO, sessions, and SCIM
In this post, we'll wire up an on-prem login that uses the customer's IdP (SSO), keeps users signed in with secure local sessions, and (optionally) provisions users via SCIM - all without any data leaving the customer's network.
What we'll build:
- A one-time, secret-gated setup area so an admin can safely create the SSO/SCIM connections before any user accounts exist.
- An SSO login flow (initiate → redirect to IdP → callback).
- Session creation + validation that happens entirely on-prem.
- (Optional) SCIM Provisioning to sync users from the customer's directory into your app and revoke access when they leave.
This example uses Node/Express with
@propelauth/byo-node. If you prefer FastAPI/Flask/Spring/.Net, the steps are the same - the API shapes are nearly identical.
Prerequisites
-
PropelAuth BYO running locally - You'll need the sidecar running with Postgres. If you haven't set it up yet:
git clone git@github.com:PropelAuth/byo-config-template.git cd byo-config-template cp .env.example .env # Add your BYO_LICENSE_KEY to .env docker compose up -d -
Node.js and Express - We'll build our examples with Express, but the concepts apply to any framework:
npm install express @propelauth/byo-node cookie-parser -
BYO client initialized - Create an integration key in the BYO dashboard (gear icon → Manage Settings → Integration Keys), then initialize:
import { createClient } from "@propelauth/byo-node";

export const auth = createClient({
    url: "http://localhost:2884", // Your BYO sidecar URL
    integrationKey: process.env.BYO_INTEGRATION_KEY,
});
Part 1: Secret-gated Admin Setup
The first challenge with on-prem auth is the bootstrap problem: how does the admin configure SSO when no users can log in yet? We solve this with a temporary, secret-protected admin endpoint.
First, let's protect an admin route with a shared secret. We'll allow the admin to set an environment variable INITIAL_SETUP_SECRET and then our frontend can send that secret in a header to authenticate.
function checkSetupSecret(req, res, next) {
    const setupSecret = process.env.INITIAL_SETUP_SECRET;
    if (!setupSecret || req.headers["x-setup-secret"] !== setupSecret) {
        return res.status(401).json({ error: "Invalid setup secret" });
    }
    next();
}
Now we can create an endpoint for SSO configuration. We'll use the Generic IdP type since it works with any OIDC provider:
// Admin endpoint for initial SSO setup
app.post("/admin/setup/sso", checkSetupSecret, async (req, res) => {
    // Create the OIDC client configuration
    const result = await auth.sso.management.createOidcClient({
        // Since this is on-prem, we assume a single organization
        // and use a fixed customerId
        customerId: "default-org",

        // This is a URL in YOUR application that the IdP will redirect back to.
        // We'll set this route up shortly, and you should provide this value to the customer
        redirectUrl: `${process.env.APP_URL}/api/auth/callback`,

        // Your customer will provide these values from their IdP setup
        idpInfoFromCustomer: {
            idpType: "Generic",
            authUrl: req.body.authUrl,
            tokenUrl: req.body.tokenUrl,
            userinfoUrl: req.body.userinfoUrl,
            clientId: req.body.clientId,
            clientSecret: req.body.clientSecret,
            usesPkce: req.body.usesPkce || false,
        },

        // Optional: Restrict logins to specific email domains
        // e.g., ["acme.com"]
        allowedEmailDomains: req.body.emailDomains,
    });

    if (!result.ok) {
        return res.status(400).json({ error: result.error });
    }

    res.json({ success: true });
});
Note: For Okta or Azure AD/Entra, configuration is slightly simpler since PropelAuth can infer the URLs. Replace the
idpInfoFromCustomerwith:
- Okta:
{ idpType: "Okta", ssoDomain: "acme.okta.com", clientId, clientSecret, usesPkce }- Entra:
{ idpType: "MicrosoftEntra", tenantId, clientId, clientSecret, usesPkce }
Your customer's admin calls this endpoint once during initial deployment. After SSO is configured, you can disable the secret and all auth goes through their IdP.
Part 2: SSO Login Flow
With SSO configured, users can now log in... but we haven't built the login flow yet. Enterprise SSO login flows have two steps:
- Initiate the login and redirect the user to their IdP.
- Handle the callback after the user authenticates at their IdP.
Since this is an on-prem setup, we have the added advantage of not needing to figure out which customer/org the user belongs to - there's only one.
First, we initiate the SSO login:
// Start SSO login
app.get("/api/auth/login", async (req, res) => {
    const result = await auth.sso.initiateOidcLogin({
        customerId: "default-org", // Your organization ID
    });

    if (!result.ok) {
        if (result.error.type === "ClientNotFound") {
            return res.status(404).json({ error: "SSO not configured" });
        }
        return res.status(500).json({ error: "SSO initiation failed" });
    }

    // Set CSRF protection cookie
    res.cookie("oidc_state", result.data.stateForCookie, {
        httpOnly: true,
        secure: true,
        sameSite: "lax",
        maxAge: 5 * 60 * 1000, // 5 minutes
    });

    // Redirect user to their IdP
    res.redirect(result.data.sendUserToIdpUrl);
});
Next, handle the callback after the user authenticates with their IdP:
// Handle callback from IdP
app.get("/api/auth/callback", async (req, res) => {
    const result = await auth.sso.completeOidcLogin({
        stateFromCookie: req.cookies.oidc_state,
        callbackPathAndQueryParams: req.originalUrl,
    });

    if (!result.ok) {
        // You can handle specific error types
        if (result.error.type === "LoginBlockedByEmailAllowlist") {
            return res.redirect("/login?error=email_not_allowed");
        } else if (result.error.type === "ScimUserNotActive") {
            return res.redirect("/login?error=user_deactivated");
        }
        return res.redirect("/login?error=sso_failed");
    }

    // SSO successful! Get user info
    const ssoUser = result.data;

    // While not strictly necessary, it's a good idea to
    // create or update a local user record for your product.
    const user = await upsertUser({
        idFromSsoProvider: ssoUser.oidcUserId, // Stable ID from IdP
        email: ssoUser.email,
    });

    // Create a session (see next section)
    const sessionResult = await auth.session.create({
        userId: user.id,
        ipAddress: req.ip,
        userAgent: req.headers["user-agent"],
    });

    if (!sessionResult.ok) {
        console.error("Session creation error:", sessionResult.error);
        return res.status(500).json({ error: "Internal error" });
    }

    res.cookie("session", sessionResult.data.sessionToken, {
        httpOnly: true,
        secure: true,
        sameSite: "lax",
    });
    res.redirect("/dashboard");
});
You (and your users) are now set up to log in via SSO! If you'd like to test this out locally, you can follow our setup instructions for every common identity provider. You can also link your customer to those docs for their own setup.
Part 3: Session Management
Logins are great, but users need to stay logged in. This is where sessions come in, as they allow users to remain authenticated without going back to the IdP for every request.
In the previous section, we created a session after a successful SSO login. Now, let's see how to validate that session on subsequent requests.
Create a middleware to protect routes:
// Middleware to validate sessions
async function requireAuth(req, res, next) {
    const sessionToken = req.cookies.session;

    if (!sessionToken) {
        return res.status(401).json({ error: "Session invalid" });
    }

    const result = await auth.session.validate({
        sessionToken,
        ipAddress: req.ip,
        userAgent: req.headers["user-agent"],
    });

    if (!result.ok) {
        res.clearCookie("session");
        return res.status(401).json({ error: "Session invalid" });
    }

    // Attach user to request
    req.userId = result.data.userId;
    next();
}
Use this middleware on protected endpoints:
// Protected endpoint example
app.get("/api/user/profile", requireAuth, async (req, res) => {
    res.json({ userId: req.userId });
});
And then, for good measure, let's add a logout endpoint that invalidates the session:
// Logout endpoint
app.post("/api/auth/logout", requireAuth, async (req, res) => {
    await auth.session.invalidateByToken({
        sessionToken: req.cookies.session,
    });

    res.clearCookie("session");
    res.json({ success: true });
});
Part 4: SCIM Provisioning (Optional)
SCIM automatically syncs users from the customer's directory. Setting up SCIM is optional, but it's a great way to ensure that user access and metadata/groups are always in sync with the customer's identity provider.
The SCIM setup itself is very straightforward, you don't actually need to collect any additional information from the customer. All we need is a new route for creating the SCIM connection:
// Admin endpoint for initial SCIM setup
app.post("/admin/setup/scim", checkSetupSecret, async (req, res) => {
    const scimResult = await auth.scim.management.createScimConnection({
        // Make sure this matches the customerId used in SSO setup
        customerId: "default-org",
        displayName: "Primary SCIM Connection",
    });

    if (!scimResult.ok) {
        console.error("SCIM setup error:", scimResult.error);
        return res.status(500).json({ error: "Internal error" });
    }

    res.json({
        scimApiKey: scimResult.data.scimApiKey,
        scimUrl: `${process.env.APP_URL}/api/scim`,
    });
});
This will provide the customer with a SCIM URL and API key to configure in their IdP. If you are testing locally, you can follow our SCIM setup instructions for common identity providers.
Once our customer has configured SCIM in their IdP, their IdP will start sending SCIM requests to our app. PropelAuth BYO handles the SCIM protocol complexity - you just need one wildcard endpoint:
// Single endpoint handles ALL SCIM operations
app.use("/api/scim/*", async (req, res) => {
    // Forward to PropelAuth BYO
    const result = await auth.scim.scimRequest({
        method: req.method,
        pathAndQueryParams: req.url,
        body: req.body,
        scimApiKey: req.headers.authorization,
    });

    if (!result.ok) {
        console.error("SCIM error:", result.error);
        return res.status(500).json({ error: "Internal error" });
    }

    // PropelAuth BYO will alert you of any critical actions,
    // e.g. you need to disable a user in your system
    if (result.data.status === "ActionRequired") {
        const response = await handleScimAction(result.data);

        if (!response.ok) {
            console.error("SCIM action handling error:", response.error);
            return res.status(500).json({ error: "Internal error" });
        }

        return res
            .status(response.data.responseHttpCode)
            .json(response.data.responseData);
    }

    // If there are no actions required, just return the response
    // that BYO provides for us
    res.status(result.data.responseHttpCode).json(result.data.responseData);
});
One of the most important parts of SCIM is handling user lifecycle actions (create, disable, delete). BYO will require you to confirm these actions to ensure your system stays in sync. This means that you never have to wrestle with webhooks and your customer's data is always consistent.
async function handleScimAction(data) {
    const { action, connectionId, commitId, userId } = data;

    if (action === "LinkUser") {
        // New user from IdP - create or find existing user
        // A user can already exist if they logged in via SSO before SCIM was set up
        // so we use the `ssoUserSubject` (which should match the ID they got when they logged in via SSO)
        // to see if we already have them
        const userId = await upsertUser({
            idFromSsoProvider: data.ssoUserSubject,
            email: data.primaryEmail,
        });

        // Link SCIM user to your user ID
        return await auth.scim.linkScimUser({
            connectionId,
            commitId,
            userId,
        });
    }

    // Handle enable/disable/delete
    if (action === "DisableUser") {
        await setUserActive(userId, false);
        await auth.session.invalidateAllForUser({ userId });
    } else if (action === "EnableUser") {
        await setUserActive(userId, true);
    } else if (action === "DeleteUser") {
        await deleteUser(userId);
        await auth.session.invalidateAllForUser({ userId });
    }

    // Confirm the action was handled
    return await auth.scim.commitScimUserChange({
        connectionId,
        commitId,
    });
}
And that's it! You now have a complete on-prem auth solution with SSO, secure sessions, and SCIM provisioning.
Next steps
The resulting setup is secure, compliant, and easy to operate. You can, however, take it further by:
- Letting your customer configure session duration and rotation policies.
- Letting your customer restrict access to their office IPs.
- Create different types of sessions (e.g., short-lived for admins, long-lived for regular users).
- Collect custom properties from your users via SCIM and use them for role-based access control or attribute-based access control in your app.
Your customers will appreciate the flexibility and security of an on-prem auth solution that respects their policies and keeps their data safe.
What you get (and why this works on-prem)
After implementing this setup, you have:
- Zero external dependencies during runtime. The BYO sidecar runs alongside your app. Session validation, SSO flows, and SCIM sync all happen within the customer's network.
- One integration, multiple IdPs. The same code works for Okta, Azure AD/Entra, Google Workspace, or any OIDC-compliant provider.
- Compliance-friendly architecture. All auth data stays in the customer's Postgres. Structured JSON logs make auditing straightforward.
The beauty is that this entire setup - SSO, SCIM, sessions - runs in roughly 200 lines of code. No complex state machines, no webhook gymnastics, no syncing user data across network boundaries. Just straightforward API calls that work the same whether you're developing locally or deployed in your customer's data center.