Your enterprise customers are asking:
- "Can we use Okta to log in?"
- "We need automatic user provisioning from our IdP"
- "When someone leaves, their access needs to be revoked immediately"
- "Can we sync user groups from Entra?"
What they are actually asking for is Enterprise SSO (Single Sign-On) and SCIM (System for Cross-domain Identity Management).
In this post, we'll cover what Enterprise SSO and SCIM are, what decisions you need to make when adding them to your product, and how to implement them at a high level. Along the way, we'll also link to documentation showing you how to add Enterprise SSO and SCIM using PropelAuth BYO, our self-hosted authentication sidecar.
ELI5: SSO and SCIM
SSO (Single Sign-On) is how users log in. It's an alternative to logging in to your product with an email and password.
Enterprise SSO lets your customers' employees log into your app using their existing company credentials. They enter some information about themselves (this is often their email address) and are redirected to their company's login portal (this is often a tool like Okta, Entra, JumpCloud, etc). The value that the customer gets is they set this up for ALL the products they use (like GitHub, Slack, and your product), meaning their employees have one shared account for everything they need to get their job done.
Enterprise SSO only handles the login process, though. And this leads to a few important questions like, "What happens if a user's email address changes?" or "What if they leave the company?" Well, you wouldn't really know until they next try to log in, which can be a problem for some applications. This is where SCIM comes in.
SCIM (System for Cross-domain Identity Management) automatically syncs users' information to your application. When someone joins your customer's company and gets added to Okta, they're automatically created in your product. When they leave and IT disables their account, they're immediately locked out of your product too.
The value of SCIM is that it automates user management. Your customers don't have to manually add or remove users from all the products they use - their identity provider (Okta, Entra, etc.) does it for them.
Adding SSO and SCIM to your product
Enterprise SSO and SCIM are table stakes for any product selling to mid-market or larger companies. But they can be complex to implement, especially if you're not familiar with identity protocols.
The good news: with PropelAuth BYO, you can add both without migrating to an external auth provider, giving up your user data to a third party, or rewriting your auth system.
But before we get into the implementation details, we have to make an important architectural decision.
The account merging question
What happens when an existing user wants to log in with SSO?
Let's say jane@acme.com already has an account in your product with a password. Acme Corp just set up Enterprise SSO. When Jane tries to log in with her Identity Provider (IdP), what should happen?
Option 1: Convert the existing account to an SSO account
The current account for jane@acme.com merges with the SSO login.
Jane can no longer log in with a password - she must use SSO.
The good news is she keeps all her data, settings, history - and possibly most importantly, her user ID.
While this might seem rare, it's actually quite common. Customers will try out your product with a few users first, and then later decide to roll it out more broadly with SSO. If you don't merge accounts, those initial users will lose all their work. And those initial users are often your champions at the company.
However, whenever you merge accounts, you need to be cautious. The safest route here is to email Jane a confirmation link before converting her account. This way, you ensure that the person logging in with SSO is indeed the owner of the existing account.
Pros:
- Seamless user experience
- No data migration needed
- Users don't lose their work
Cons:
- Need to handle account merging carefully
Option 2: Keep Enterprise SSO accounts separate
Treat SSO logins as completely separate accounts. If jane@acme.com logs in with SSO, she gets a brand new account, even if she already had one with a password.
Pros:
- Simpler implementation
- Clear security boundaries
- No ambiguity about account ownership
Cons:
- Users might lose access to existing data
- Potential confusion with multiple accounts
- Migration path needed for existing users
Which should you choose?
Both options are reasonable. If you keep your customers / tenants isolated already, option 2 is a no-brainer.
We often recommend option 1, since you get a better user experience for users switching to SSO. You just need to be careful to never merge accounts without an email confirmation step. You can always err on the side of security, return an error, and ask the user to contact support if you're unsure.
Adding SSO Support
With that out of the way, there are three main parts to adding SSO support:
- Allowing customers to configure SSO settings in your product.
- Updating your login flow to support SSO.
- Handling the SSO callback and creating user sessions.
Allowing customers to configure SSO settings
When a customer wants to set up SSO, you and them need to exchange some information. For OIDC-based SSO (the more modern option), your customer will need to provide information like:
client_id- The identifier for your application in their IdP.client_secret- A secret key used to authenticate your application with their IdP.authorization_endpoint- The URL where users are redirected to log in.token_endpoint- The URL where your application exchanges authorization codes for tokens.userinfo_endpoint- The URL where your application can retrieve user information.
Each IdP is a bit different, but you can refer to our documentation for example setup guides for popular IdPs like Okta, Entra, Google Workspace, OneLogin, and JumpCloud.
You will also need to provide your customer with a redirect_uri - this is the URL in your application where the IdP will send users after they log in. This URL typically looks something like https://yourapp.com/auth/callback.
With PropelAuth BYO, you can manage this configuration manually via the dashboard or programmatically via the API. For other libraries/services, you'll want to consult their documentation on how to store and manage OIDC client configurations.
Updating your login flow to support SSO
Once the SSO connection is configured, you'll need to update your login flow to support it. The main question to answer is "How can I redirect enterprise customers to a login page just for them, while still supporting regular email/password logins for other users?"
There are generally two approaches people take here:
SSO-first login flow: On your login page, you ask users to enter their company email address first. You then check if that email's domain is associated with an SSO configuration. If it is, you redirect them to the IdP's login page. If not, you show the regular email/password login form.
Keep SSO separate: You have a separate button for Enterprise SSO logins. Users who want to log in with Enterprise SSO click that button and are taken to a page where they enter their company information to initiate the SSO flow.
Which you should choose depends on your user base. If most of your users are from enterprises, the SSO-first approach makes sense. If you have a mix of enterprise and individual users, keeping SSO separate is often clearer.
Handling the SSO callback and creating user sessions
No matter which login flow you choose, the overall flow is the same:
- The user is redirected to the IdP's login page (in other words, they are redirected to their employer's login page)
- The user logs in with their company credentials
- The IdP redirects the user back to your application's
redirect_uri(e.g. https://app.example.com/auth/callback) with an authorization code - (You are here) Your application exchanges that authorization code for the user's information and creates a session for them
You can think of this callback as "finishing" the login process. Once you handle the callback, you'll receive the user's information, such as their email address, name, and any other claims the IdP provides.
From here, you can upsert the user into your database (creating a new user if they don't exist, or updating their information if they do) and create a session for them (just like you would for a regular login).
And that's it! Each of your customers only need to set up the SSO connection once, and after that, all of their employees can log in using their company's credentials.
Adding SCIM Support
SCIM, in theory, is pretty straightforward. Your customers' IdP has all the information about their users, and they just need to send that information to your application. This leads to two main tasks:
- Providing an API key or token for your customer to authenticate with your SCIM endpoint.
- Setting up the SCIM endpoints to handle user/group provisioning requests.
Providing a SCIM API key or token
The endpoints that we are going to set up are pretty sensitive. They can create, update, and delete users in your application. We want to make sure that only authorized requests from your customer's IdP can access them.
The common approach here is to provide your customer with an API key, which they enter into their IdP's SCIM configuration. This key is then included in the Authorization header of each request to your SCIM endpoint.
If you'd like to see what this looks like, we have guides for popular IdPs, and here's where your customers would enter the API key in Okta:
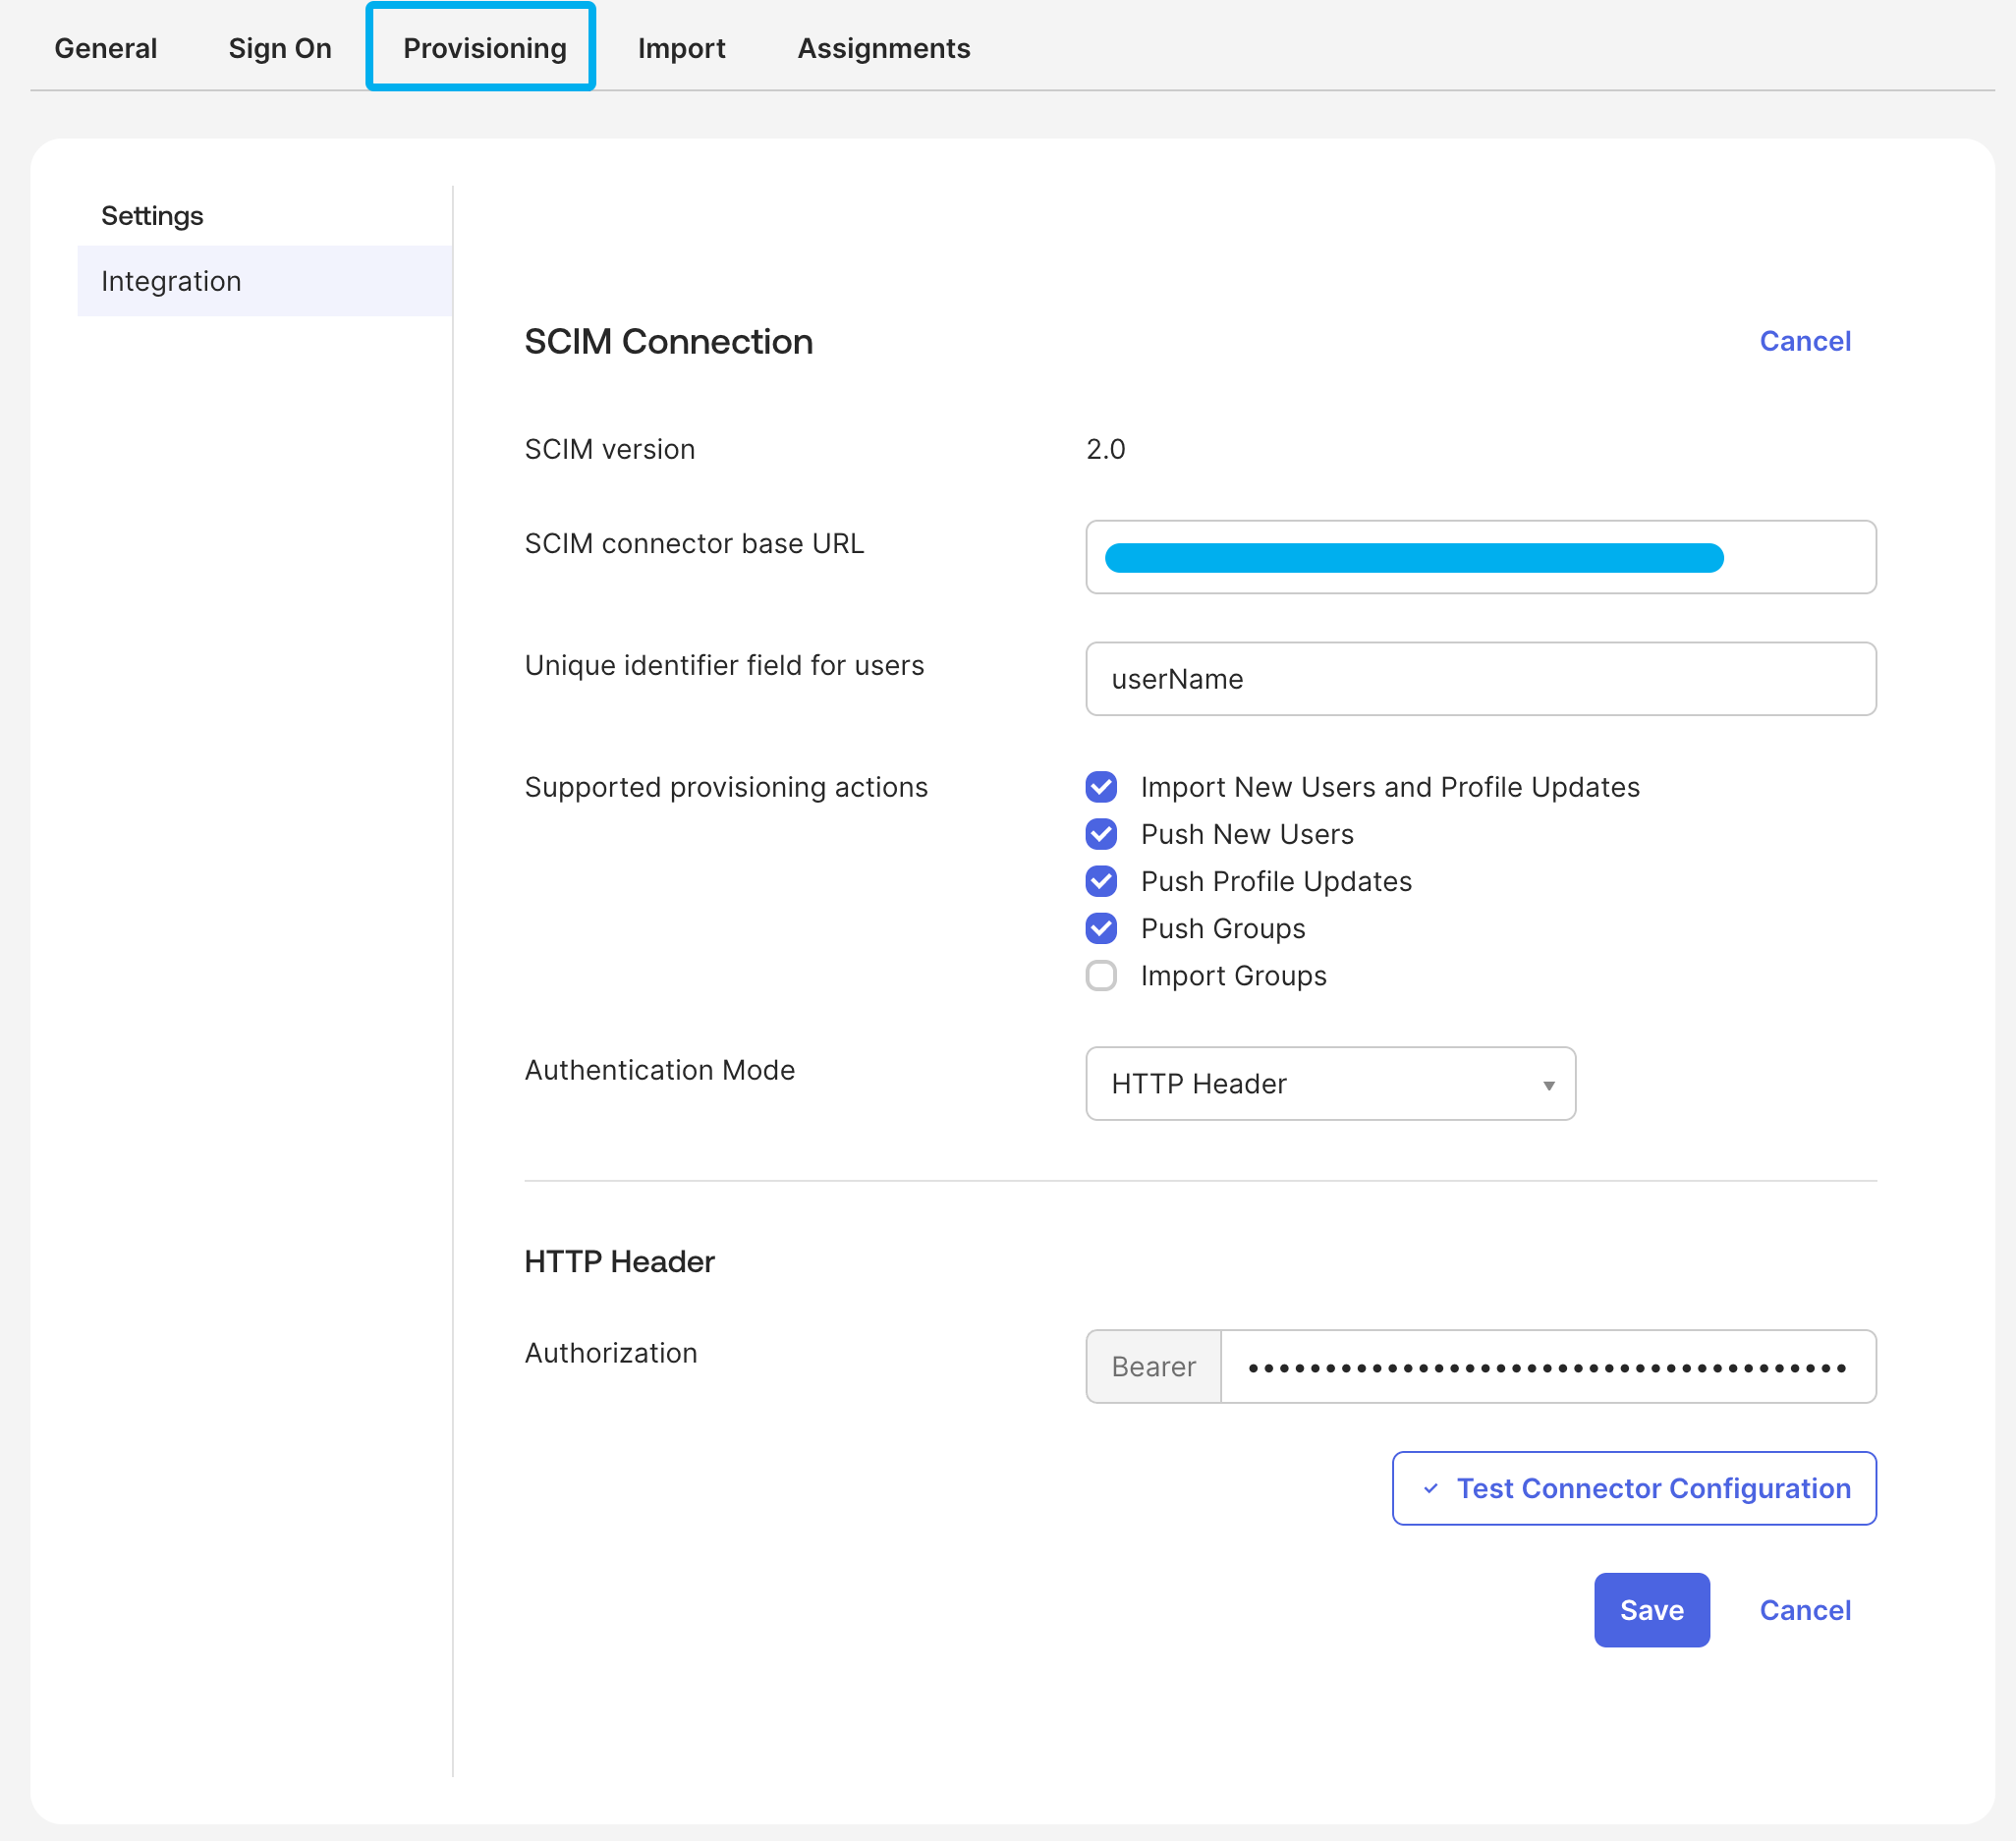
Setting up the SCIM endpoints
You'll also notice in that screenshot that Okta asks for a "SCIM Base URL". This is the URL where your SCIM endpoints will live. For example, you can use https://api.yourapp.com/scim/v2/ and the IdP will make requests to endpoints like https://api.yourapp.com/scim/v2/Users and https://api.yourapp.com/scim/v2/Groups.
We won't go into the full details of implementing a SCIM server here, but each IdP will use your SCIM endpoints to perform actions like:
- Getting a list of users
- Provisioning a new user
- Updating an existing user (some IdPs will use PUT and give you the full user object, others will use PATCH and only give you the fields that changed)
- Deactivating or deleting a user
The most important thing to make sure of, is that when you get a critical action like deactivating a user, you immediately revoke their access to your application. This is the main value of SCIM - ensuring that when someone leaves the company, they can no longer access your product.
If you use PropelAuth BYO, you can just forward any SCIM request (including the path and method), and we'll return the exact response to return to the IdP as well as any critical actions you need to take. Our goal is to standardize the SCIM implementation so you don't have to worry about the various quirks of each IdP.
Gotchas and common questions
Once you have SSO and SCIM set up, there are a few common questions and gotchas that come up.
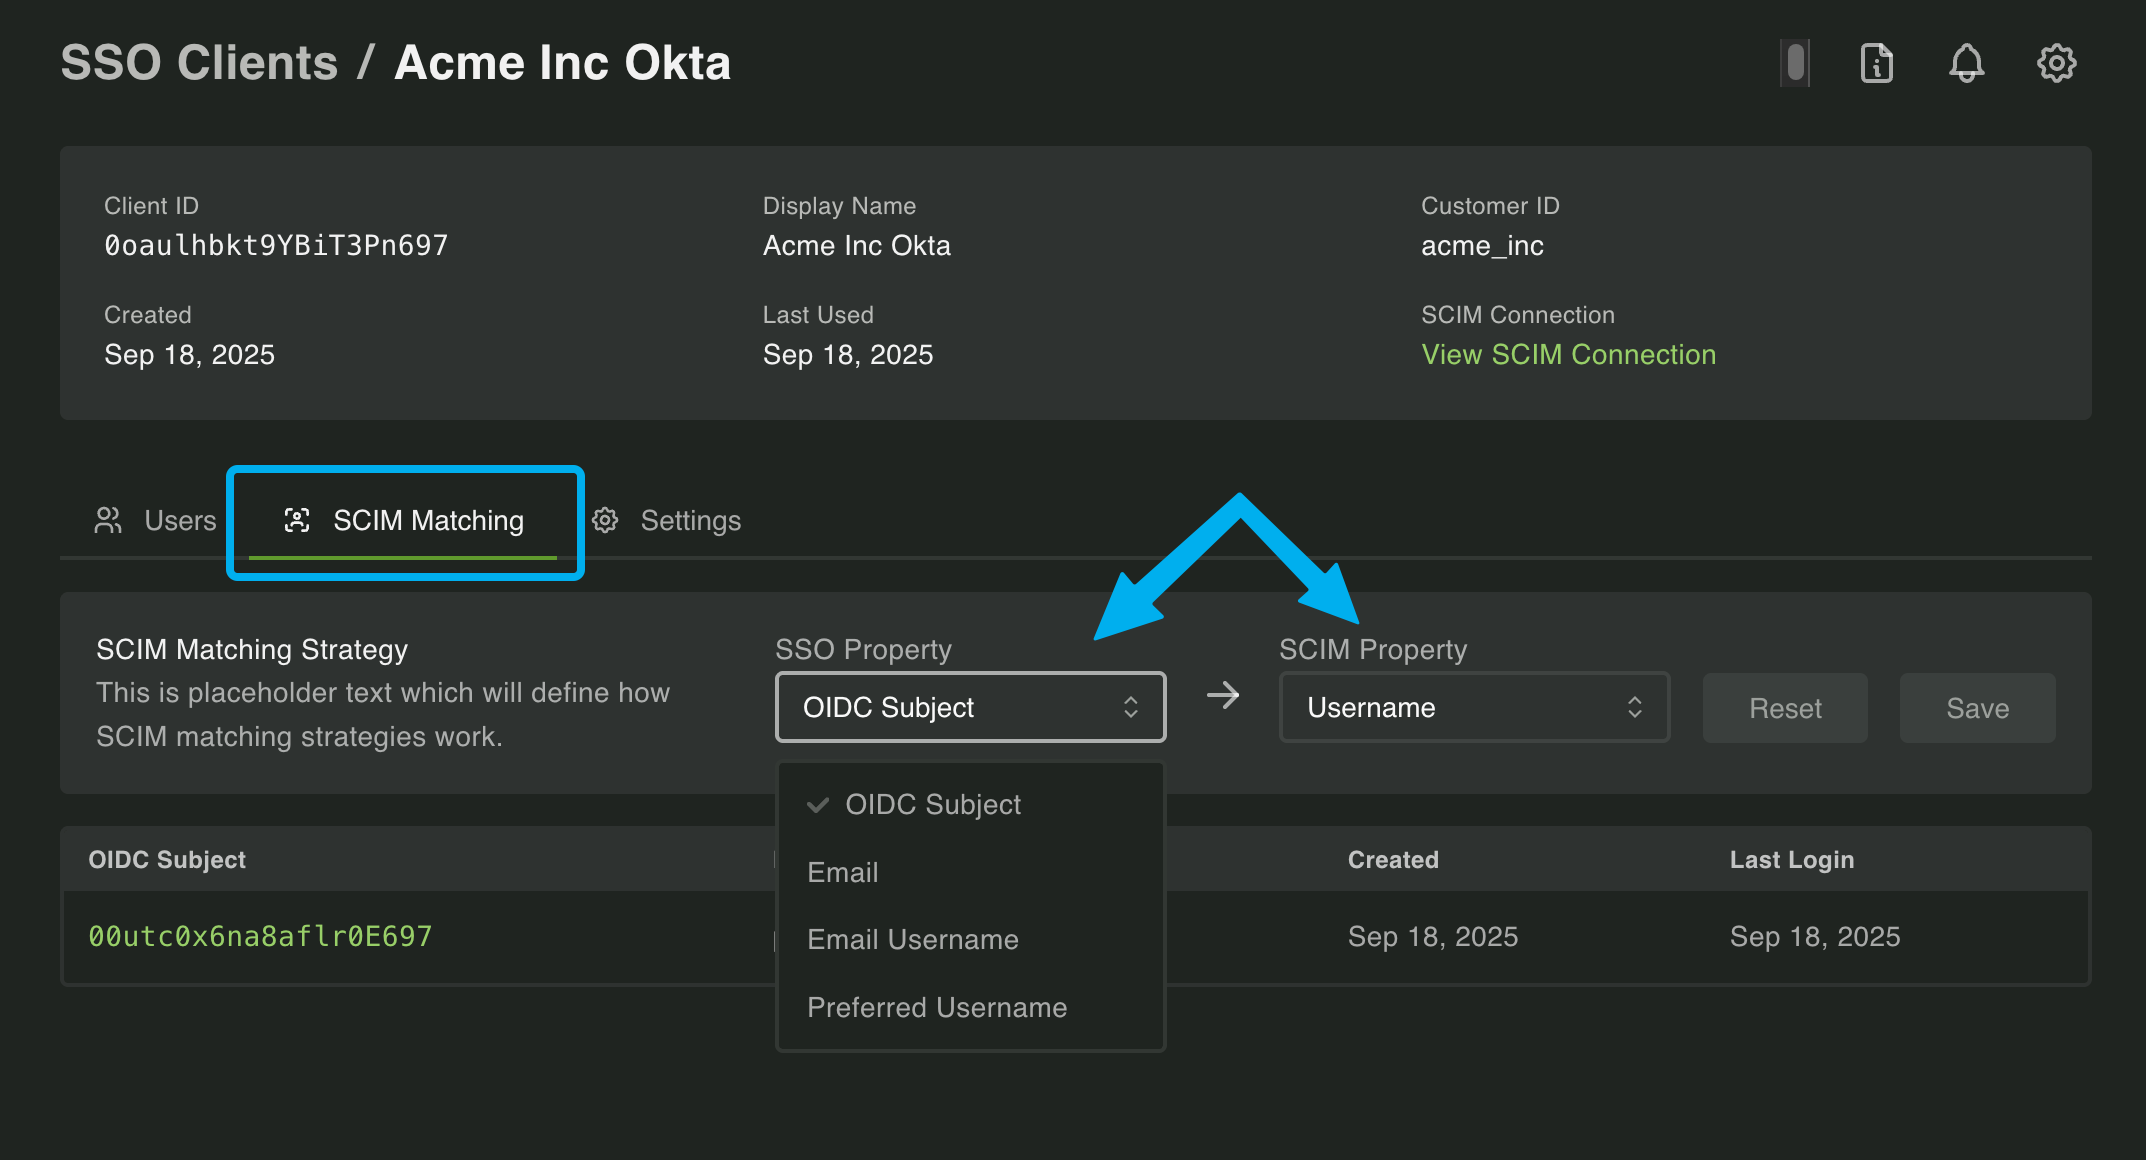
How do I match SCIM users to SSO users?
Matching users between SSO and SCIM is important for all those SCIM operations to work correctly. For example, when a user is deactivated via SCIM, you need to make sure that the correct user is deactivated in your system.
You'd imagine this would be straightforward and they both have the same unique identifiers, right? Unfortunately, no. All IdPs are different, and it's fairly common for the default settings to provide IDs that do not line up. This is made somewhat worse by the fact that IdPs also make everything configurable.
This is again a case where there are two common approaches:
Match on email address: This is a simple approach, works around the quirks of different IdPs, and is easy to understand. That being said, email addresses can change, so it's not always ideal to use it as the unique identifier.
Provide instructions to customers to configure the externalId to match the SSO ID: SCIM has a few fields that can be used as identifiers like userName and externalId. externalId is meant to be an immutable unique identifier for the user, making it a great choice for matching users between SSO and SCIM. You can provide instructions to your customers on how to set up the externalId properly which is more robust than matching on email, but... well, people don't always follow instructions.
With PropelAuth BYO, we have a UI that let's you test and configure how users are matched between SSO and SCIM. You choose which field to match on for both SSO and SCIM, and we show you which users would NOT be matched based on your configuration.
Are there any cases where I want to allow both SSO and password logins?
Once Enterprise SSO is set up, most customers will want to enforce all their employees are required to login with it. In practice, however, there are a few exceptions:
- Contractor access. Not all contractors will be in the company's IdP, so they may need to be special cased to allow password logins.
- Your support/success teams access. You may want to create accounts in your customer's tenant for your internal teams to help them troubleshoot issues. Customers won't often onboard your team members into their IdP, so password logins may be necessary here as well.
- Backup access. Some customers may want to have a few "break glass" accounts that can log in with a password in case their IdP is down.
Email address validation
One thing to be aware of is that most IdPs do not validate email addresses. If you do any kind of account merging based on email addresses, you need to be cautious.
One common constraint is to only allow Enterprise SSO logins from a set of verified email domains. This way, if someone tries to log in with SSO using an email address that doesn't belong to the company, you can block it.
PropelAuth BYO makes adding Enterprise SSO and SCIM easy
As you can see, there are a lot of moving parts when it comes to adding Enterprise SSO and SCIM support... and that doesn't even include keeping up to date with the various requirements of the different IdPs. Instead of burning tons of engineering cycles to get your Enterprise customers the login methods they need, use PropelAuth BYO to get up and running in an afternoon.